Root Rot Isn't Always a Death Sentence — Here's How to Save the Plant
Quick answer
Yes, a plant can recover from root rot if healthy roots remain. Unpot the plant, trim all mushy brown roots, treat the remaining healthy roots with a diluted 3% hydrogen peroxide solution, and repot in fresh dry soil. Skip the hydrogen peroxide step and you risk re-infection.
Pulling a plant out of its pot and finding a slimy, dark mess where the roots used to be is genuinely awful. But before you write the plant off completely, take a closer look. If there are still some firm, light-colored roots in there — even just a few — you have something to work with. Root rot is serious, but it’s recoverable more often than people think, as long as you treat it the right way. The problem is most people skip a step that makes all the difference: treating the remaining healthy roots before they go into the new pot. Skip that, and you’re often just moving the problem.
What Root Rot Actually Looks Like (And Smells Like)
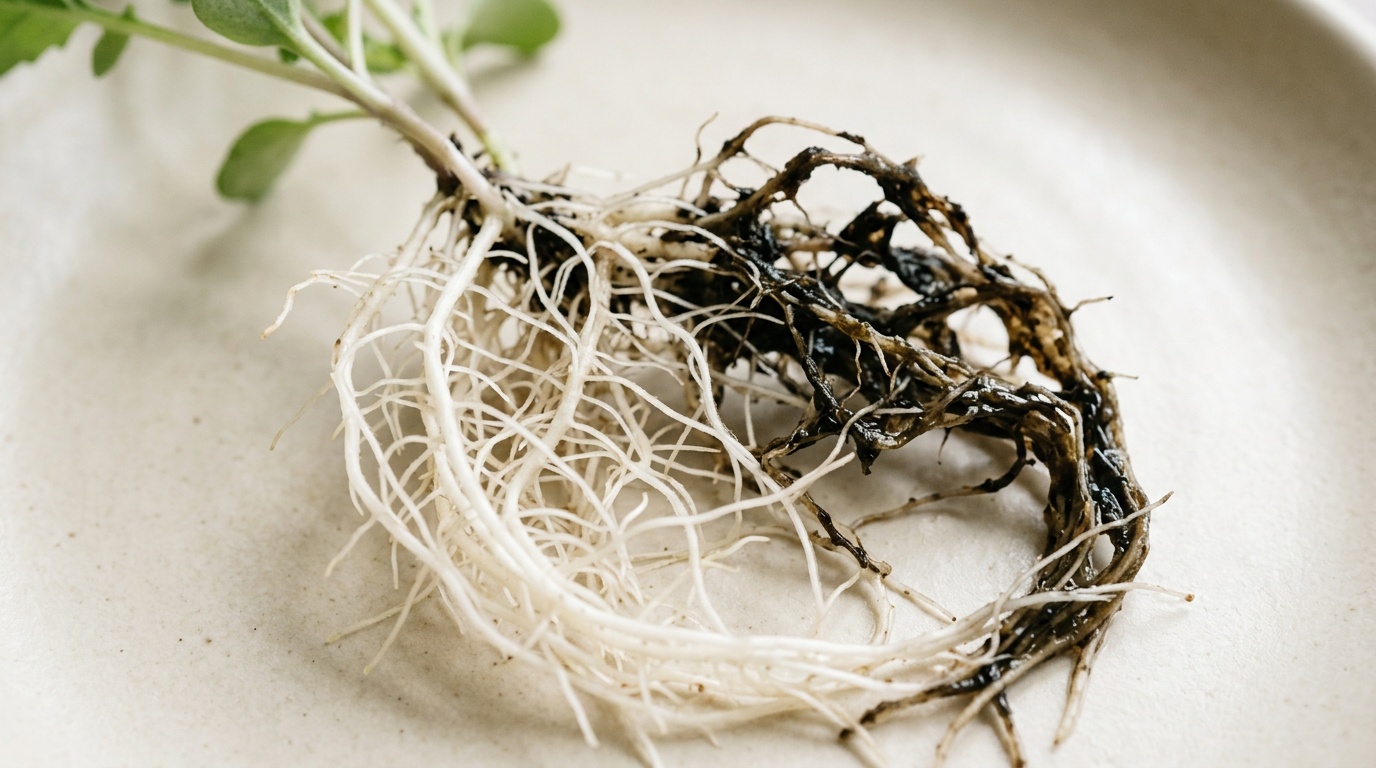
Before you do anything, you need to know what you’re dealing with. Healthy roots are white or light tan and feel firm when you touch them. Rotted roots are brown or black, soft, and slimy — some of them may basically dissolve when you handle them. It’s pretty unmistakable once you’ve seen it.
The smell is another giveaway. Root rot has a sour, musty odor — kind of like a wet basement or old compost left too long. If you unpot your plant and get hit with that smell before you even look at the roots, trust your nose. Something’s wrong.
You’ll usually notice signs above the soil first: wilting that doesn’t improve after watering, yellowing leaves, or a plant that just looks like it’s slowly giving up despite nothing obviously being wrong. If you’re trying to figure out whether your plant is wilting from too little water or too much, My Plant Is Wilting — Is It Thirsty or Drowning? (How to Actually Tell) breaks that down in detail. But if you’re already at the point of pulling the plant out and finding mushy roots, you’re past the diagnostic stage — it’s time to act.
Mild vs. Severe: Triage First
Not all root rot situations are the same, and it helps to size things up before you start trimming.
Mild root rot looks like this: some brown, mushy tips or a few rotted roots, but most of the root mass is still intact and firm. You’ve probably caught it early, and the plant has a good chance of making a full recovery.
Severe root rot is when the majority of the root system is gone — mostly brown and slimy throughout, with only a small number of healthy roots left, if any. The plant is under serious stress. It can still sometimes be saved, but it needs more support during recovery, and honestly the odds are lower.
Knowing which situation you’re in helps you set realistic expectations and adjust your care approach after repotting.
The Recovery Protocol: Step by Step
Step 1: Unpot and Rinse
Get the plant out of its pot and gently shake off as much of the old soil as you can. Then rinse the roots under lukewarm water. You want to actually see what you’re working with — soil clinging to the roots makes it harder to tell which roots are healthy and which ones need to go.
While you’re at it, toss that old soil. Don’t reuse it. The pathogens that caused the rot can live in the soil, and putting your plant back into infected mix — even partially — is asking for a repeat performance.
Step 2: Trim Everything That’s Gone
Get a clean pair of scissors or pruning shears and cut off every root that’s brown, mushy, or slimy. Cut back to where the root tissue looks firm and healthy, even if that means removing quite a bit. If a root is questionable, err on the side of removing it. Leaving even a small amount of infected root tissue can let the rot spread to the healthy roots you’re trying to save.
Wipe your scissors with rubbing alcohol between cuts if the rot is severe — it’s a small thing but it keeps you from dragging pathogens across healthy tissue.
Step 3: The Step Most People Skip — Treat the Healthy Roots
This is the part that actually matters and that almost nobody talks about. Even after you’ve trimmed away the obviously rotten roots, the remaining healthy roots may still be carrying the fungal or bacterial pathogens that caused the rot in the first place. If you just drop those roots into fresh soil, there’s a real chance the rot comes back.
The fix is simple: before repotting, soak the trimmed roots in a diluted hydrogen peroxide solution. Mix one part 3% hydrogen peroxide (the standard drugstore kind) with two parts water, and let the roots soak for about 30 minutes. The hydrogen peroxide kills off pathogens without harming the roots themselves. It’s a little foamy and looks dramatic, but it works.
After soaking, let the roots air dry for 20–30 minutes before you repot. You don’t want to pack wet roots into fresh soil and start the moisture cycle all over again.
Step 4: Repot in the Right Soil — Dry
Fresh, well-draining soil is non-negotiable here. And I want to be specific: use dry soil when you repot a root rot plant, not pre-moistened mix. The roots need a chance to settle without sitting in moisture right away.
If you’re using store-bought potting mix, be aware that a lot of commercial mixes hold way more water than they need to — which is part of what leads to root rot in the first place. I’ve had much better luck with a custom mix. My general go-to is 4 parts coco husk fiber, 4 parts Halatool Natural Sphagnum Moss (9oz), 1 part orchid bark, a quarter part Char Bliss Organic Biochar (8qt), and a quarter part worm castings. It drains well, holds some moisture without getting waterlogged, and the biochar helps with drainage and soil health over time. If you want more on why store-bought soil can be a problem for tropicals, Why Store-Bought Potting Mix Is Slowly Killing Your Tropicals gets into the details.
Make sure whatever pot you use has drainage holes. Good drainage is one of the most important things you can do for a plant recovering from root rot. A pot with no way for water to escape is how you end up back where you started.
Step 5: Choose the Right Pot Size
Don’t move a plant that’s lost a significant amount of its root mass into a large pot. This is a mistake people make with good intentions — more soil, more room to grow, right? But a plant with a reduced root system can’t draw water from a large volume of soil, which means the outer soil just stays wet and creates the same conditions that caused the problem. Go with a pot that’s appropriately sized to the root mass you have left after trimming.
After Repotting: What Not to Do
Don’t water heavily right after repotting. Give the plant a light watering — just enough to settle the soil — and then hold off. Let the plant tell you when it needs water. A Fpxnb Soil Moisture Meter is genuinely helpful here. Rather than guessing or going by a schedule, you can check the moisture level in the soil directly and water when it actually reads dry. I find it especially useful after repotting when I’m trying to be careful not to overdo it.
Don’t fertilize. A plant recovering from root rot doesn’t need the extra push of fertilizer — it needs to focus on rebuilding roots. Hold off on feeding for at least six weeks, probably longer. Once you start seeing new growth, that’s usually a sign the roots are recovering and you can think about fertilizing again.
Don’t move it around constantly. Pick a spot with appropriate light for that plant and leave it there. The plant is stressed and doesn’t need additional disruptions.
For Severe Cases: Use a Humidity Dome
If the root system was pretty decimated — say you trimmed away most of the roots and only have a few healthy ones left — the plant is going to struggle because roots are how plants take up water. Without enough of them, the plant can lose moisture through its leaves faster than it can absorb it.
A humidity dome helps a lot here. A clear plastic bag placed loosely over the plant, or a proper propagation dome if you have one, raises the humidity around the plant and reduces moisture loss through the leaves while the roots rebuild. It’s not a forever solution, but for the first two to four weeks after repotting a severely damaged plant, it can make the difference.
How to Know It’s Working
New growth is a good sign, but don’t panic if you don’t see it right away. Repotting is stressful on a healthy plant, let alone one recovering from rot. Give it time.
What you don’t want to see: continued yellowing and leaf drop, new roots that look brown and slimy again when you check, or soil that’s staying wet much longer than it should. If the rot comes back despite fresh soil and proper drainage, it’s worth asking whether the pot or the environment is keeping things too moist.
Keep an Eye on the Roots Going Forward
One of the best habits you can build is just paying attention to your plants before things get bad. Knowing when a plant is ready to be repotted — before it gets root bound or before conditions get bad in the pot — is a skill worth developing. Your Plant Is Telling You When It Needs Repotting. Here’s How to Hear It is a good read if you want to get better at catching those signals early.
Root rot happens. Overwatering is easy to do, especially when you’re newer to plants and you think more water means more growth. But catching it early, treating the healthy roots before you repot, and giving the plant the right conditions afterward — that’s usually enough to turn things around.
Frequently asked questions
Can a plant recover from root rot?
Yes, if there are still some firm, white or light-colored roots remaining, the plant has a real chance. The key is acting quickly — trim the rotted roots, treat the healthy ones with diluted hydrogen peroxide, and repot in fresh dry soil. The more healthy root mass that's left, the better the odds.
How do I treat root rot in houseplants?
Unpot the plant and gently rinse the roots under lukewarm water so you can see what you're working with. Trim off any roots that are brown, mushy, or slimy using clean scissors or pruning shears. Then soak the remaining healthy roots in a solution of one part 3% hydrogen peroxide to two parts water for about 30 minutes before repotting in fresh, well-draining soil.
What does root rot smell like?
Root rot has a pretty distinct smell — kind of sour, musty, and just generally unpleasant. Some people describe it as similar to a wet basement or old compost. If you pull your plant out of the pot and get a strong bad smell from the soil or roots, that's a clear sign something's wrong even before you can see the damage.
What does root rot look like?
Healthy roots are white or light tan and firm when you touch them. Rotten roots are brown or black, soft, and slimy — they may even fall apart when you handle them. In bad cases, the entire root ball will be dark and mushy with almost no firm roots left. You might also notice the soil smells off and looks like it's staying wet longer than it should.